Click the video above to view ‘How to Build a Nicho Box’.
Materials
A list of items you need to make your nicho.
- Cardstock Paper (any color)
To print the Nicho Template with - Coloring Supplies
Markers, pens, crayons and/or colored pencils - Colored Paper
To make the backdrop of your photo - Small Decorations
Small jewels, beads, stickers, ribbons, etc. - Small Cardboard Jewelry Box
Approximately 3.5”x3.5”x1” - Photo of Loved One or Object
Must be smaller than 3”x3” - Craft Cutting Tools
You can use scissors and/or an X-ACTO knife - Command Strip (optional)
Best solution to hang on wall and damage-free - Glue & Tape
White glue or a glue stick; colored masking tape or washi tape
Instructions
Follow this quick guide to make your nicho.
- Print Template
Click here to download and print our guide template. Make sure to just print the template (page 6) on cardstock. This will give your nicho the needed sturdiness. - Cut Template
Use scissors to cut out the nicho template along the dashed lines. To cut the inner square, we recommend
using an X-ACTO knife for precision. If you prefer to use scissors, softly fold the template in the middle to make a slit. Then use that slit to insert your scissors so you can cut along the dashed lines as an ‘x’.
Both tools will help create a window opening with flaps. - Color & Decorate
The fun now begins! You can color your nicho frame using markers, pens or colored pencils. Better yet, use colored cardstock to give your nicho a clean look. You can also take it to the next level by adorning it with jewels, stickers and beads (try not to over do it, remember we don’t want to weigh down or tear the frame). Don’t know where to start? Try using your loved one‘s favorite color, team, food, characters, etc. - Your Photo & Backdrop
While the decorations dry, cut and make a 3×3 inch square piece of paper. The main purpose of this paper is to adhere your photo/object; it also serves as a backdrop. Try using colored paper or simply decorate it as you wish. Once this backdrop is cut, glue your photo to it. - Assemble Together
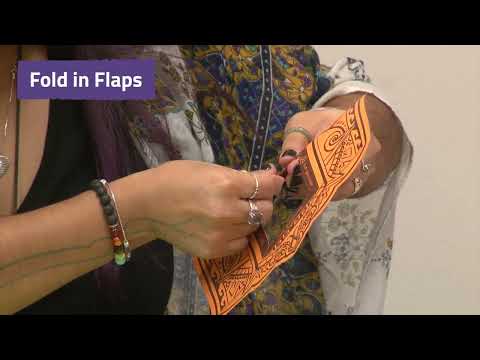
You are now ready to make your nicho box! Try to glue your frame to your box — this next part can be a little tricky. It might help to reference the how-to video above for this part. Please make sure your nicho frame is fully dried. With decorations facing you, try to fold your flaps along the inner window you cut in step 1. Then turn the nicho frame over so the decorations are facing down on the table, you should see the flaps you just folded sticking up. The goal is to glue each flap to the inside walls of the box. This will help connect and secure the frame to the box. Make sure you glue each flap along each corresponding inside wall. Try not to put too much glue, you want to be able to stick the flaps but not make a mess. Wait for the glue to dry. Congratulations, you have just built your nicho box. - Display & Share
Add it to your Day of the Dead altar or hang it on a wall using a Command Strip (this solution is damage-free to your wall surface). Take a photo and post it on your social media. Share and celebrate your departed
loved ones.